


On a late summer day, you might find me standing in the middle of my classroom, one hand on my chin, the index finger on my cheek. I’m seemingly just standing there, looking around at the empty room, save the pile of tables and chairs and shelves in the far corner. Busy custodians, finishing up the summer deep clean, peek in on me with a puzzled look. I smile and say, “I’m okay, I’m just thinking.”
Some of this thinking can be done at home or on various summer road trips, but it is never complete until I stand in the middle of my classroom visualizing where each piece of furniture should go, how the setup will complement instruction, and how it will affect traffic flow of up to 30 children and sometimes four adults.
So, as I’m standing there in the middle of my classroom—as if I am in a trance—what am I thinking about? What am I visualizing?
What will students do when they first enter the classroom? Where will they sit upon arriving?
Where will I gather students for whole group instruction? Will they come to a group area or will they remain in their seats? How many group areas do I want and how will the background of these areas—walls, bulletin boards, windows, white boards, the smart board—function as distracting hinderances or aid in displaying necessary visuals?
Will there be times during the day when all students need to be sitting at tables or desks? What will be going on during these times and what will they need to be able to see? How will I arrange seating for upwards of 30 students?
Where will my and my aide’s home base be located?
Where will each of my four centers take place and what will the traffic flow look like as students move between them?
How can I facilitate voice and choice for students? What flexible seating options can I offer?
Where will I keep books, Chromebooks, instructional materials, students’ personal items, and student supplies? How can I ensure that students can take ownership in keeping some of these items organized?
What needs to be displayed and what are the available spaces to do this?

What will students do when they first enter the classroom?
We have a soft start to the day, meaning that students arrive anytime between 8:45 and 9:00 AM. It’s nice that they trickle in, a few at a time, rather than all 28 entering at once (especially on the first day!).
When students arrive, they hang their backpack and go directly to wash their hands. The morning handwashing was instituted for Covid, but with students trickling in during our soft start this practice continues because it just makes sense.
After washing hands, students find their name card amongst all the others laid out on table five. Of course, some need help with this for the first week or two of school. They move their name card to a large pocket chart to sign in for the day. My aide knows to look at the name cards remaining on table 3 to determine who might be absent. We look at the name cards during our morning meeting Name Game and then my aide gathers them up and gets them ready for use during center time.
Students are free to sit at any table and are encouraged to choose a different table each morning. There is no assigned seating (until perhaps later in the year when a particular student or two may need special seating in order to better manage themselves) and students will change seats frequently throughout the day.
Where will I gather students for whole group instruction?
I prefer two areas to gather students on the floor for whole group instruction. One is primarily for math and the other for everything else.
Our math area is called the “number corner” because we use Bridges math and the number corner is a crucial component of that program. There is a large bulletin board there where I can display the calendar, the monthly collection, and our means for counting and tracking how many days we have come to kindergarten. There is limited space to draw or write for visuals in this area, but I do have a rolling two-sided dry erase board that I can move about the room and use as needed.
The backdrop for the main student gathering area is the smart board (also where I use my document camera); a white board; a small stage where I sit to instruct or read to the class and students sit when they have the opportunity to be the center of attention; the easel; and, the rolling dry erase board when needed. There is a large bulletin board in the corner that is at a funky angle to be of much use; however, this is where I hang anchor charts associated with read aloud focus lessons. Off at another weird angle is the area where I display my alphabet cards and phonics cards. I always used to gather students on the floor to do whole group phonics, but during Covid I kept them at their seats at the tables. I discovered that they could see better and were more focused without all of the distractions of their peers right next to them on the floor. Since then, I mix it up for phonics instruction, sometimes keeping them on the floor, sometimes sending them to tables.

Will there be times during the day when all students need to be sitting at tables or desks?
When I think through my daily schedule, I most definitely need to set up the classroom to accommodate upwards of 30 students at tables or desks. The first instance for this during the school day is when students come in during soft start time and find a seat and then shortly after that when we start whole group phonics. As I mentioned earlier, I sometimes gather the students close to me on the floor for phonics but some days send them to the tables. All students will again be at their seats later in the day for writing time. My approach to teaching writing involves me circulating around the room quickly and teaching all students at their individual levels. I prefer that students do not write on their own—for example at centers that have no teacher supervision—because this establishes an opportunity to practice wrong or not work up to one’s potential, both of which can create lasting bad habits. And, for those occasional times when we do a fun project, all students will again need to have a seat at which to work.
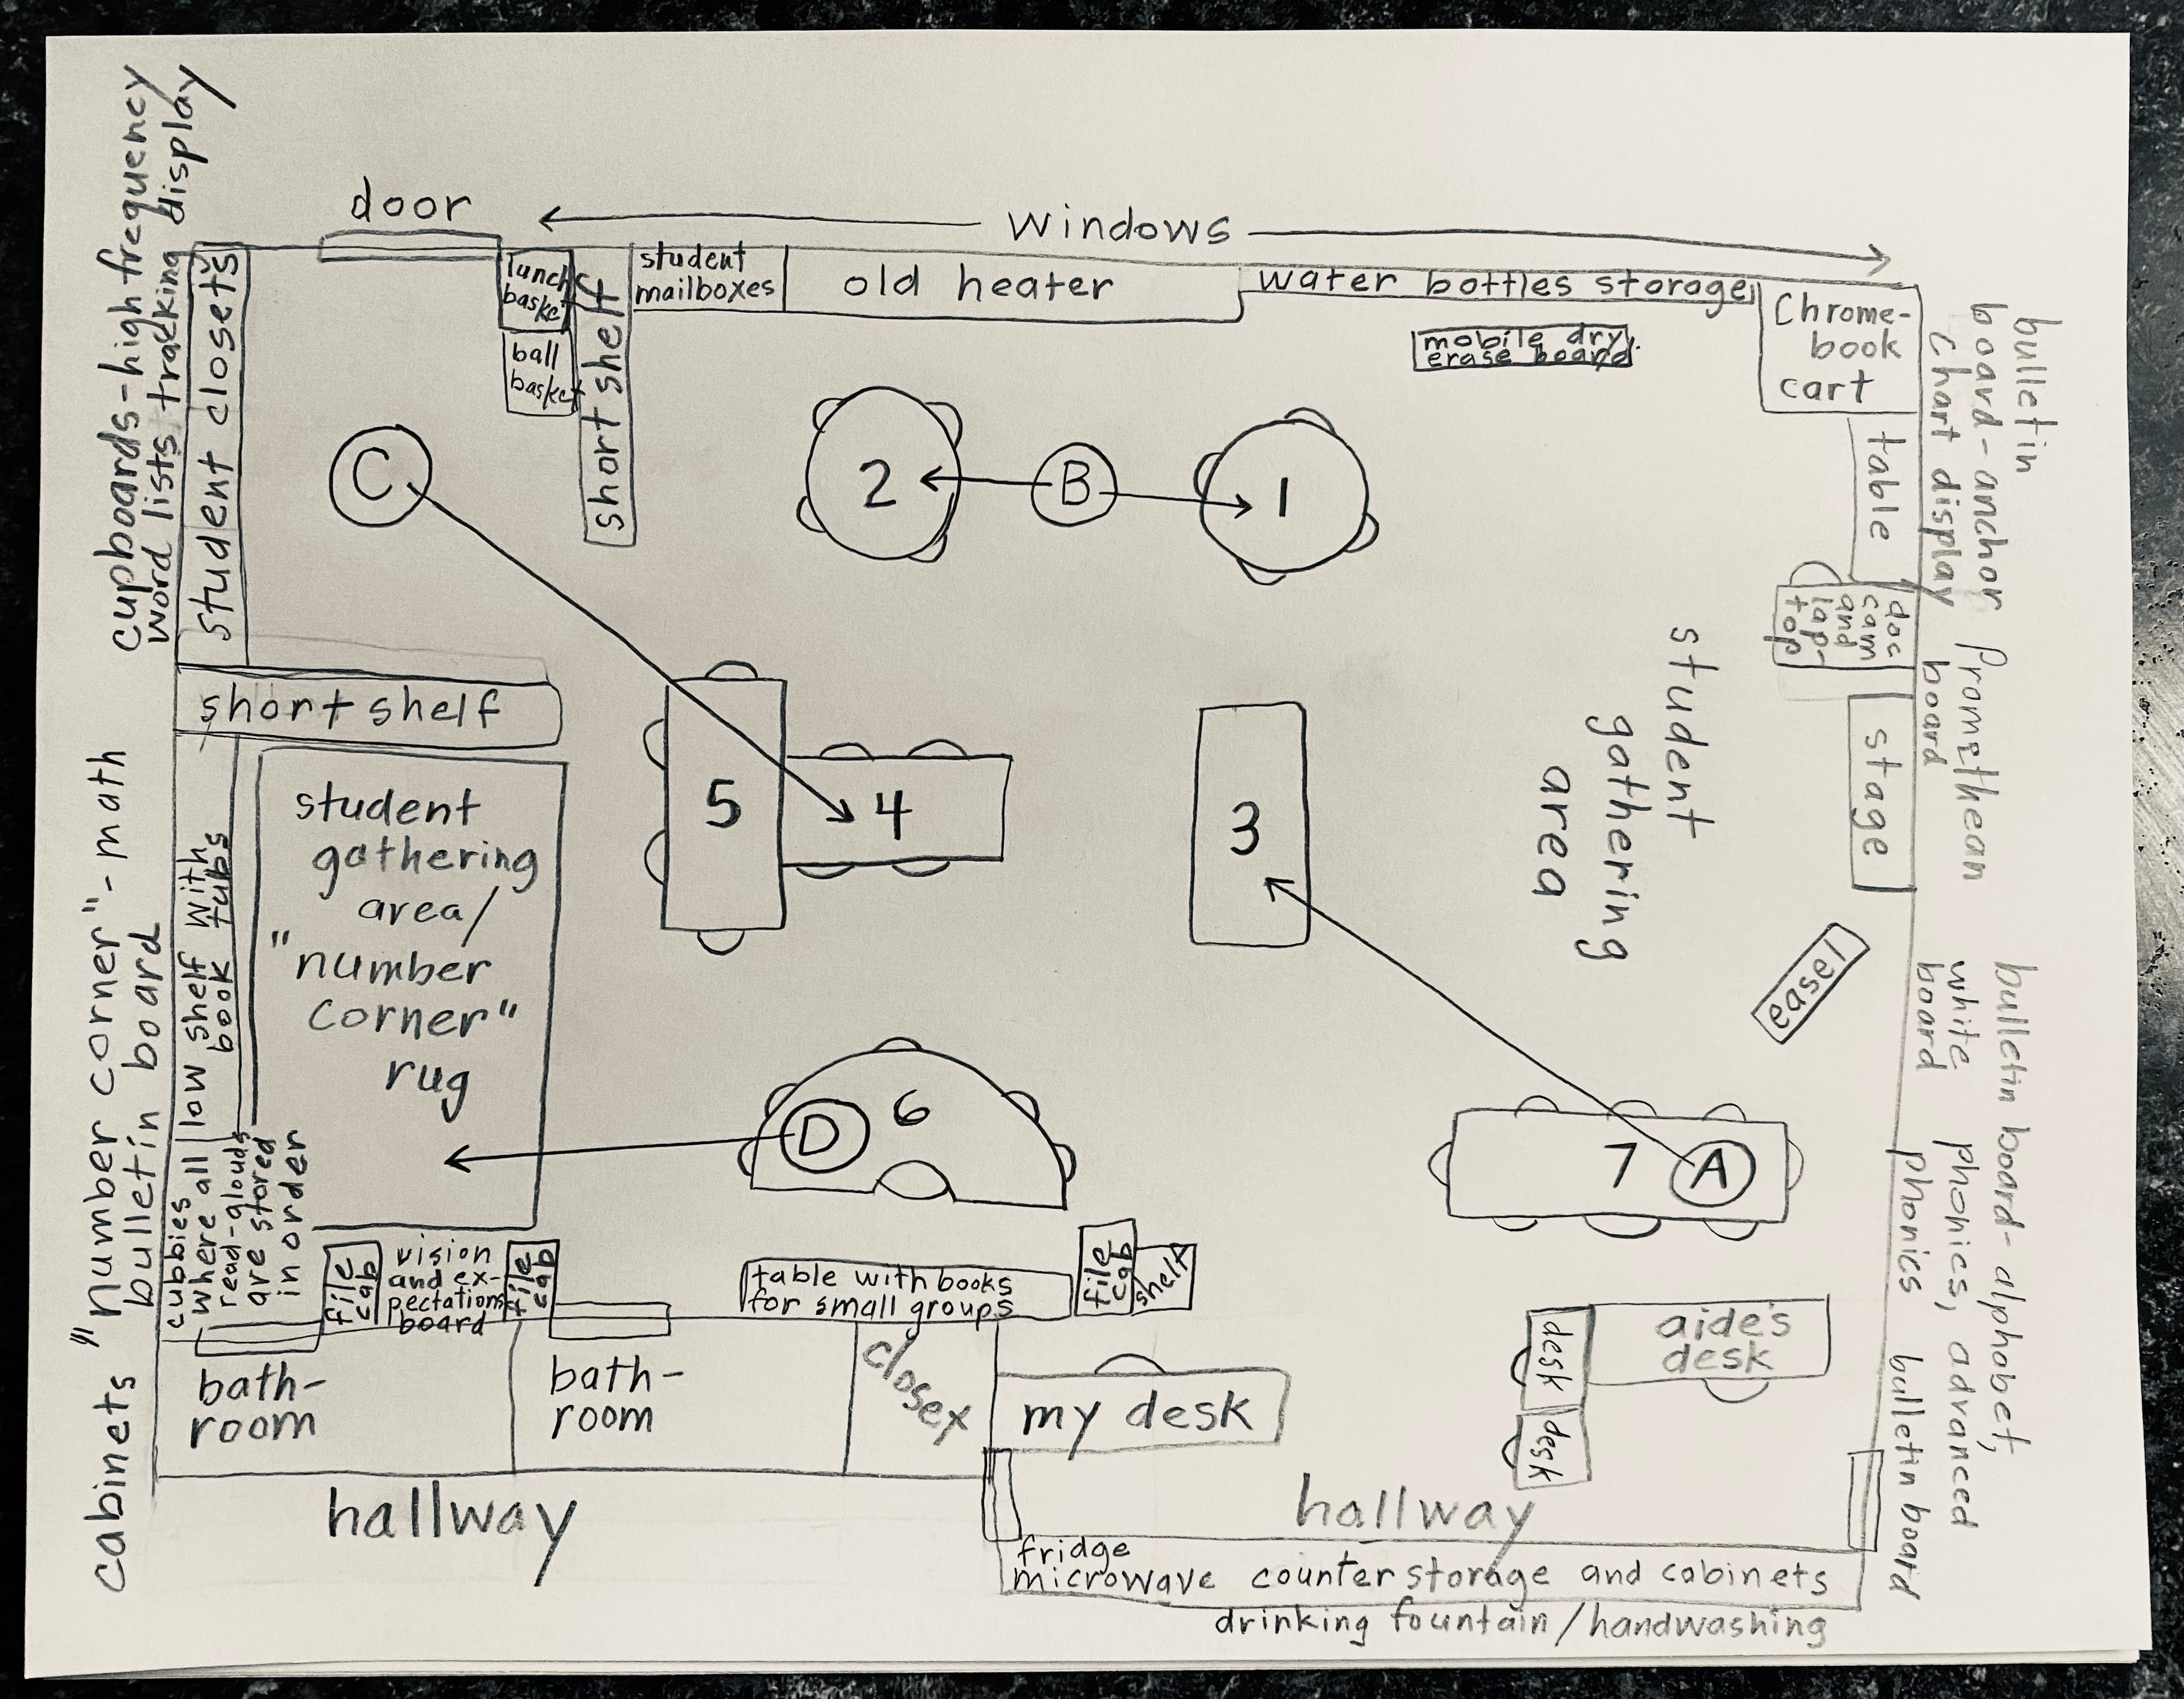
My classroom has tables rather than desks, by design. There are seven tables as seen on the classroom map. You’ll notice that there are no chairs at table 3; this is because it is a low table where students sit on the floor to work (an easy flexible seating option, just lower the table legs). Tables are mostly oriented toward the “front” of the room where the smart board, white board, and stage are located. The best seats, as far as being able to see what I am presenting, are at tables 1-6 so I teach my students to fill those first. If there are more than 25 students present on any day, the last few who trickle in or sit down will choose seats at table seven.
Where will my and my aide’s home base be located?
My classroom is mostly a rectangle except for this strange area off to one side that incorporates an internal hallway between neighboring classrooms. Because this area is tiled and not carpeted and also because I cannot see it from all other locations in the classroom, I tend not to have students over there often. Therefore, this makes for an obvious place to have my desk and the aide’s desk. As you can see on the map, my desk is close to table 6—which is my teaching table—and my aide’s desk is close to table 7, which is her teaching table. My teacher desk area includes a tall filing cabinet and a closet (unfortunately, not anywhere near as big as it appears on the map). By my aide’s desk, there are two student desks. She will at times pull students to these desks to work with them one-on-one or conduct assessments. Because they are off to the side, the students are not as distracted by what is going on with me and the rest of the class. Also in this area, there are cabinets and countertop for storage of teaching materials that my aide and I can both easily access. I like the fact that our desks are close together; during planning time we can easily discuss students or lessons as we work on our various tasks.

Where will each of my four centers take place?
When the school year starts, I will, of course, write often about what happens during center time. If interested, you can get a peek into centers here for now. To reduce confusion on the students’ part, increase independence, and make planning easier, I have the same four centers—location-wise—every day. These are shown on the map as A, B, C, and D. For each center, we need to be prepared to seat seven or eight students, but usually it’s more like six or seven.
Center A is at table 7 and is my aide’s center. There are plenty of chairs at this table; however, if it gets too crowded, or if students are working on different things, or if someone needs a quick timeout, table 3 is available for spillover as shown by the arrow on the map.
Center B is the independent center where students (ideally) work independently. This center happens at tables 1 and 2. I designed this intentionally—having two tables—as a group of seven kindergartners is too big to be together in one place with no adult supervision. Splitting the group to two different tables facilitates better cooperation and success at being independent from teacher intervention. Also, if a student is having difficulty with a peer, I just suggest that they move to the other table and they do not consider it to be a consequence or timeout since it is within the same center and therefore has the same activity. This center can get a bit noisy, hence the reason it is as far away as possible from my teaching table and the aide’s teaching table.
Center C is called the floor center. You can tell from the map that this is a large area just inside the door to our classroom near the closets where students hang their backpacks and personal belongings. The area is defined by two short shelves that I can see over while I am at my teaching table. It is crucial, to me, that I am able to see all students at all times. At the beginning of the year, a group of seven or eight students will be together in this area. But, as soon as they are able to understand that the floor center also encompasses table 4—as shown by an arrow on the map—then I start to split this group into two smaller groups for management reasons. Initially, it is hard for the students to understand that table 4 is the same center as the floor but it’s not long before they catch on that they will go to either of those places but not both on the same day.
Center D is my teaching table. You’ll notice there are only five student chairs there, so most days we pull chairs from table 5 over as needed. At the beginning of the year, students coming to my center will all sit at the table with me. But as the year goes on, some will sit in the “number corner” gathering area right near my table and read independently from their reading folders while I work with smaller groups at the table.
In addition to having the same four centers every day, students rotate through the centers in the same direction every day. For example, if they start at Center A with the aide, they and their whole group will then move in a counter-clockwise direction to Center B/the independent center/tables 1 and 2 and then move again to the floor center (C) and last to my center (D). No matter where they start in the rotation, they will always move in the same direction and go through the same sequence of centers each day. This allows them to move independently and focus on their learning, while also allowing me to seamlessly instruct one group after another without much management in between.
How can I facilitate voice and choice for students?
Students will sense more ownership and be more cooperative if there are opportunities for voice and choice during the school day. One of the most important things I do is to allow students to choose their seat each day. Even if I were not consciously creating an opportunity for a choice, I would still do it this way instead of having assigned seating. The reason for this is that students will be sitting in many places throughout the day and it is easier if they do not consider any one chair to be “theirs.” Because student name cards are not attached to any table, the teachers or students can grab them and take them to any table as needed for copying (at the beginning of the year, before they learn to write their name without this scaffold). Students enjoy choosing their seat every morning and I can see them putting a lot of thought into it. If I see them always going to the same table or always trying to sit by the same friends, I will remind them that they need to try a different table and different friends every day or otherwise I will choose their seat for them.
I also do not have sit spots in the student gathering areas. I have never used these and do not find them necessary. It is good for students to learn how to sit on the floor with an appropriate amount of space between each other within the larger given space. It is good for them to learn to manage their impulsivity and not reach out and touch each other during instruction. They are free to choose a place on the floor or, if need be, at a nearby table. Some students are not comfortable sitting crisscross and would rather sit in a chair and this is allowed, as is standing behind the group. Other students may be sent to a table if they are having trouble on the floor, but I always say, “Come back when you’re ready.” That means they get to choose when they want to try to re-join the group.
There are other opportunities for voice and choice throughout the day, but these are the ones I keep in mind when designing my classroom arrangement.
Where will I keep books and supplies and ensure that students can take ownership for keeping some of these items organized?
Students, especially kindergartners, like to have a hand in keeping their classroom organized. And, most teachers gladly appreciate the help.
I’ve collected read aloud books over the years and organize them in crates according to my weekly themes. These I stash in cubbies in the corner by the student bathrooms where it is too crowded for much of anything else to happen.
Student “free choice” books (mostly to look at) are kept on a long low shelf in the number corner. They are there primarily because there is a large rug to sit on while students look at them; however, since they’re in tubs we can also easily move them to other areas in the room. They are not organized by level, topic, or any other category. This means that none of us have to spend time deciding which bin they go in or re-organizing them. All we focus on is making sure that books get put away right side up with the covers facing the right direction, and this is something we work on all year.
The high-quality books that I use at my teaching table are located right behind the teaching table. They are not accessible to students and I can easily swivel around in my chair and grab what I need while working with students at my table.
You might wonder where students keep their supplies since there are no desks in the room and no assigned seating. The answer is, they really have no supplies that belong to just them. All markers are in baskets on shelves and distributed to the tables only when needed. The same is true of crayons, scissors, and glue sticks. As the school year goes on, students become more responsible with grabbing these supplies when needed and managing them on their own. There is a pencil can on each table with freshly sharpened pencils and quality erasers. My wonderful aide makes sure these are ready to go each morning and they last throughout the day so there are no issues with finding a pencil to use or whose pencil is whose.
Like many classrooms, everything else is stashed wherever there is space. Games and other activities that are often used at the floor center are stored on the shelf near that center. Supplies repeatedly used at the independent tables are stored on top of the old heater nearby. Student water bottles are kept on the heater along the windows as well; students are not allowed to carry them around or take them to tables. Extra crates and bins are stashed under the table near the Chromebook cart since that is just empty space. Flexible seating options such as kid-size folding chairs and camp chairs, scoop chairs, and laundry baskets are stored between the filing cabinets near the reading area. The kids learn how to pull these out at the appropriate time and stack them just right so they will fit back into that space. Of course, lots of teaching supplies are stored in cabinets and the one closet and on top of the counter near the sink in the tile area.
There are three student closets with hooks for backpacks and jackets. I do not expect kids to keep this area super organized as there are rarely enough hooks for the number of students I have. Our goal is for most items to be hung up but, if not, at least in the closet and not spilling out onto the floor.
What needs to be displayed and what are the available spaces to do this?
Several years ago, we got training in growth mindset and goal setting. I learned to post student data in the classroom so students could watch their growth and set goals for themselves. This proved to be so effective that I continue these practices—to some extent—today. Because of this, much of my wall space is devoted to displaying student data to which teachers and students alike refer. Last year we posted word list progress, progression through the fast facts, and what phonemic awareness training level the students were on. Some teachers are horrified at the thought of posting student data, but I know from experience that kindergartners tend to look at their growth and their peers’ growth and become motivated but not discouraged. It’s just right for this age and I try to capitalize on it. Plus, my students learn so much about numbers having to look at and read these charts every day.
Another skill we keep an eye on and display for the students is their progress in learning to count to 100. We do this on the bathroom door that is right there at the number corner. I think we teachers look at this more than the students. Who’s still at the bottom? Who do we need to focus on and work with more? It’s good to have the data right in front of our faces.
As mentioned before, the large bulletin board in the number corner displays our daily math activities and a large bulletin board near the smart board is reserved for language arts anchor charts. The smart board, the whiteboard, the easel, and the rolling two-sided dry erase board serve as non-permanent displays and places where I can hang pocket charts as needed.
Irregular high frequency words (heart words) will have their own display area when it’s time to start introducing them. As our collection grows, they are constantly on display in a handy place where we can refer to them often.
Because our school does not have traditional hallways, it is difficult to display student work. However, we have a few places for this, such as the windows, the bulletin boards near the aide’s desk, and the cupboard doors.
Your classroom arrangement is a huge part of establishing effective classroom management. There will be many other ideas and tips in future posts. I hope this one helps you think through how you might want to set up your classroom for the upcoming school year.
Paid Subscribers
Please connect with this group chat to comment, ask questions, and share your ideas on this topic. I’m sure you can think of things that I forgot to mention. Busy Bee Kindergarten is better when we all learn from each other!

